Flashing Trays

When I received my trailer, I just simply couldn’t handle the idea of laying on the ground for days, drilling up into my trailer to attach the flashing. Call me lazy or call me a genius! You choose.

I do think I spent a bit more money than if I had bought the rolls of metal and installed it from underneath my trailer, but I also believe that I saved time and energy in the long run. I was able to finish my flashing – by myself – in the equivalent of 1-2 days of work, with zero bugs, dirt, and leaves in my hair and no burn marks on my arms and face from metal dropping on me (all things I vividly imagined when trying to come up with an alternative way of installing my flashing). After pondering a while with my dad, I decided to go with the following process.

–  –  –  –  –  –  –  –  –  –

Based on the measurements of the joist spaces on my trailer, I sent the below drawings that I created on my computer to three different sheet metal companies. (Always shop around for the cheapest pricing! It’s worth it.)

Subfloor Flashing Sheet Metal Quote Request

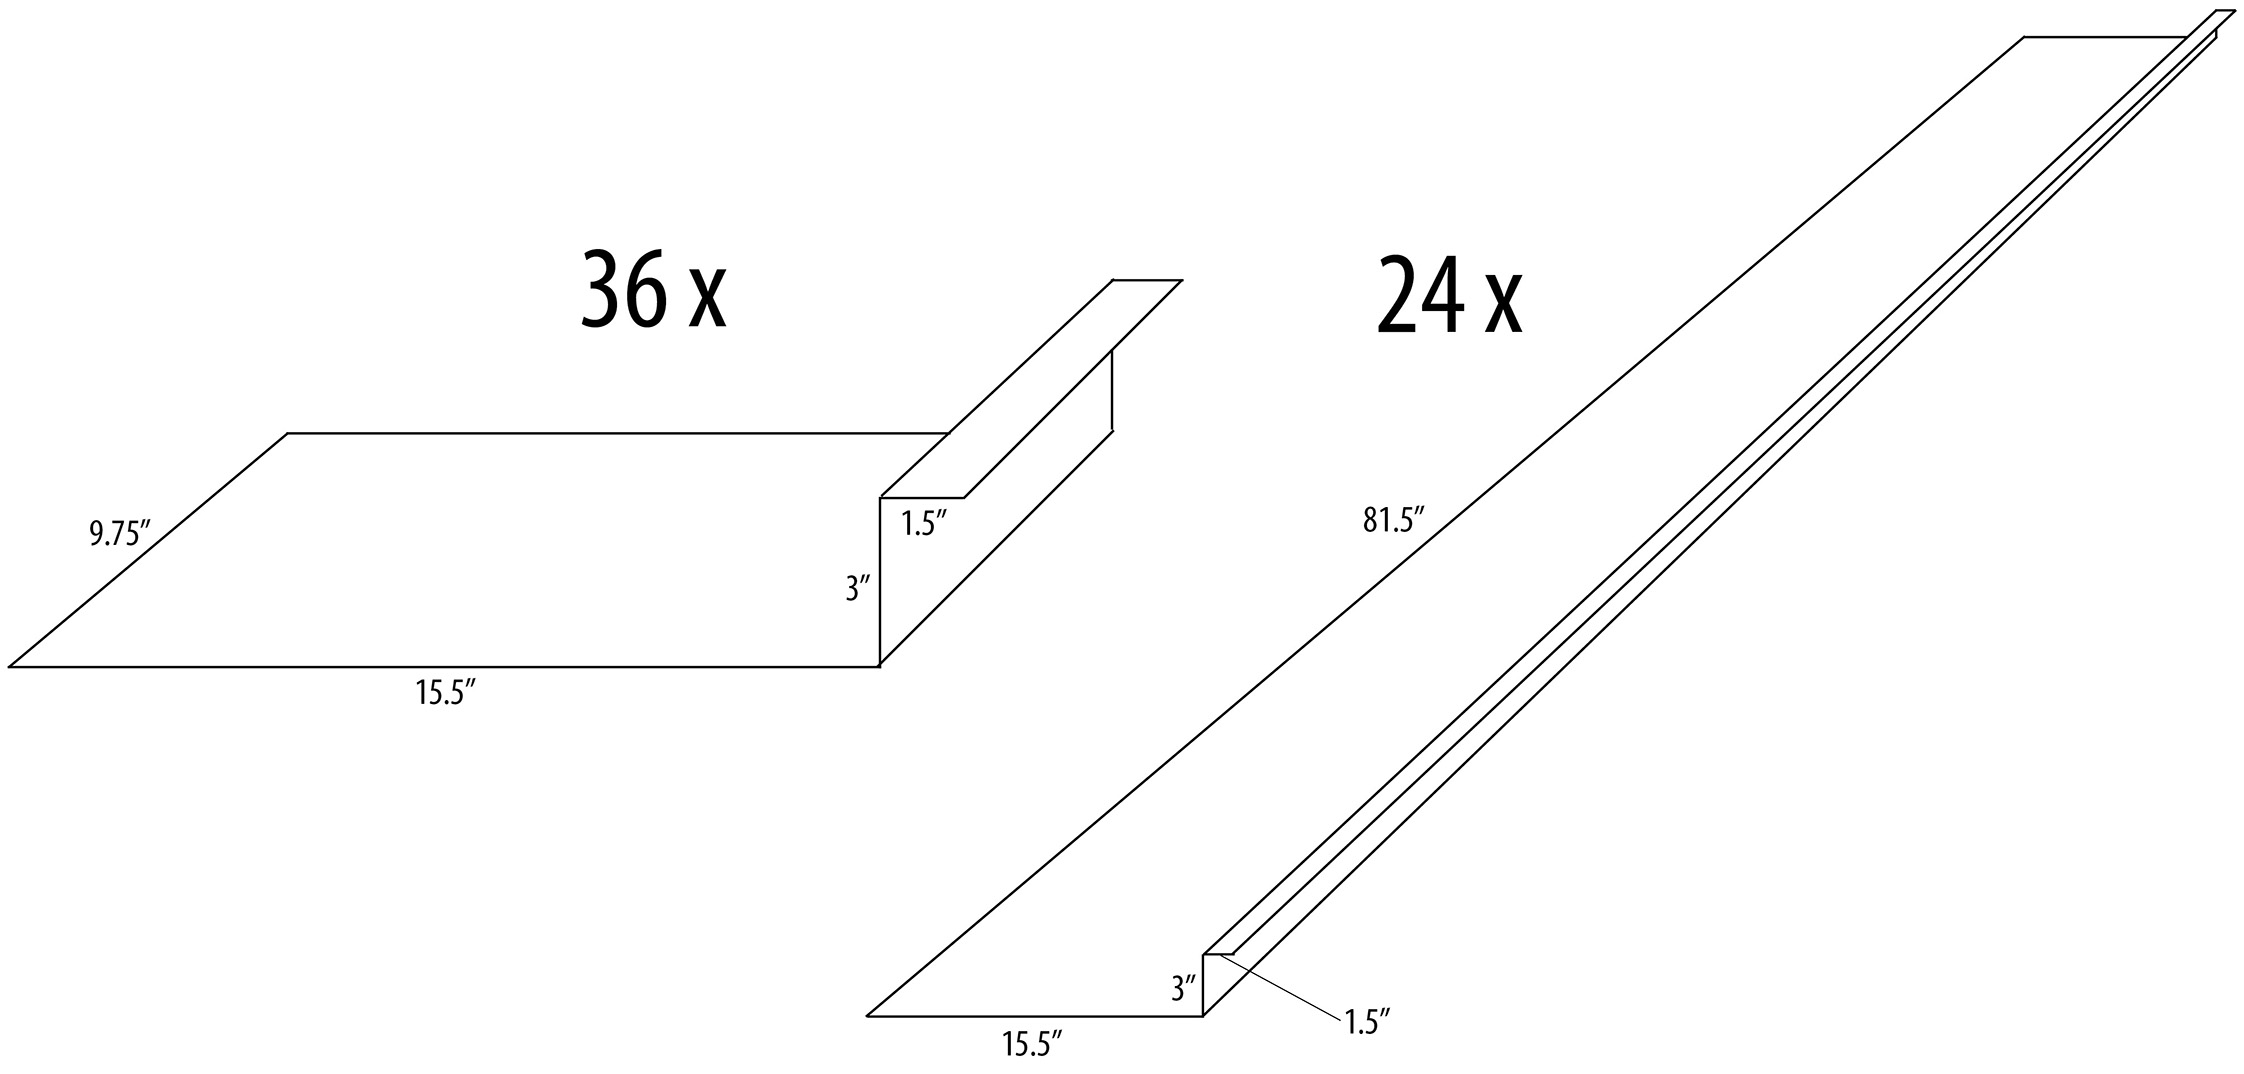
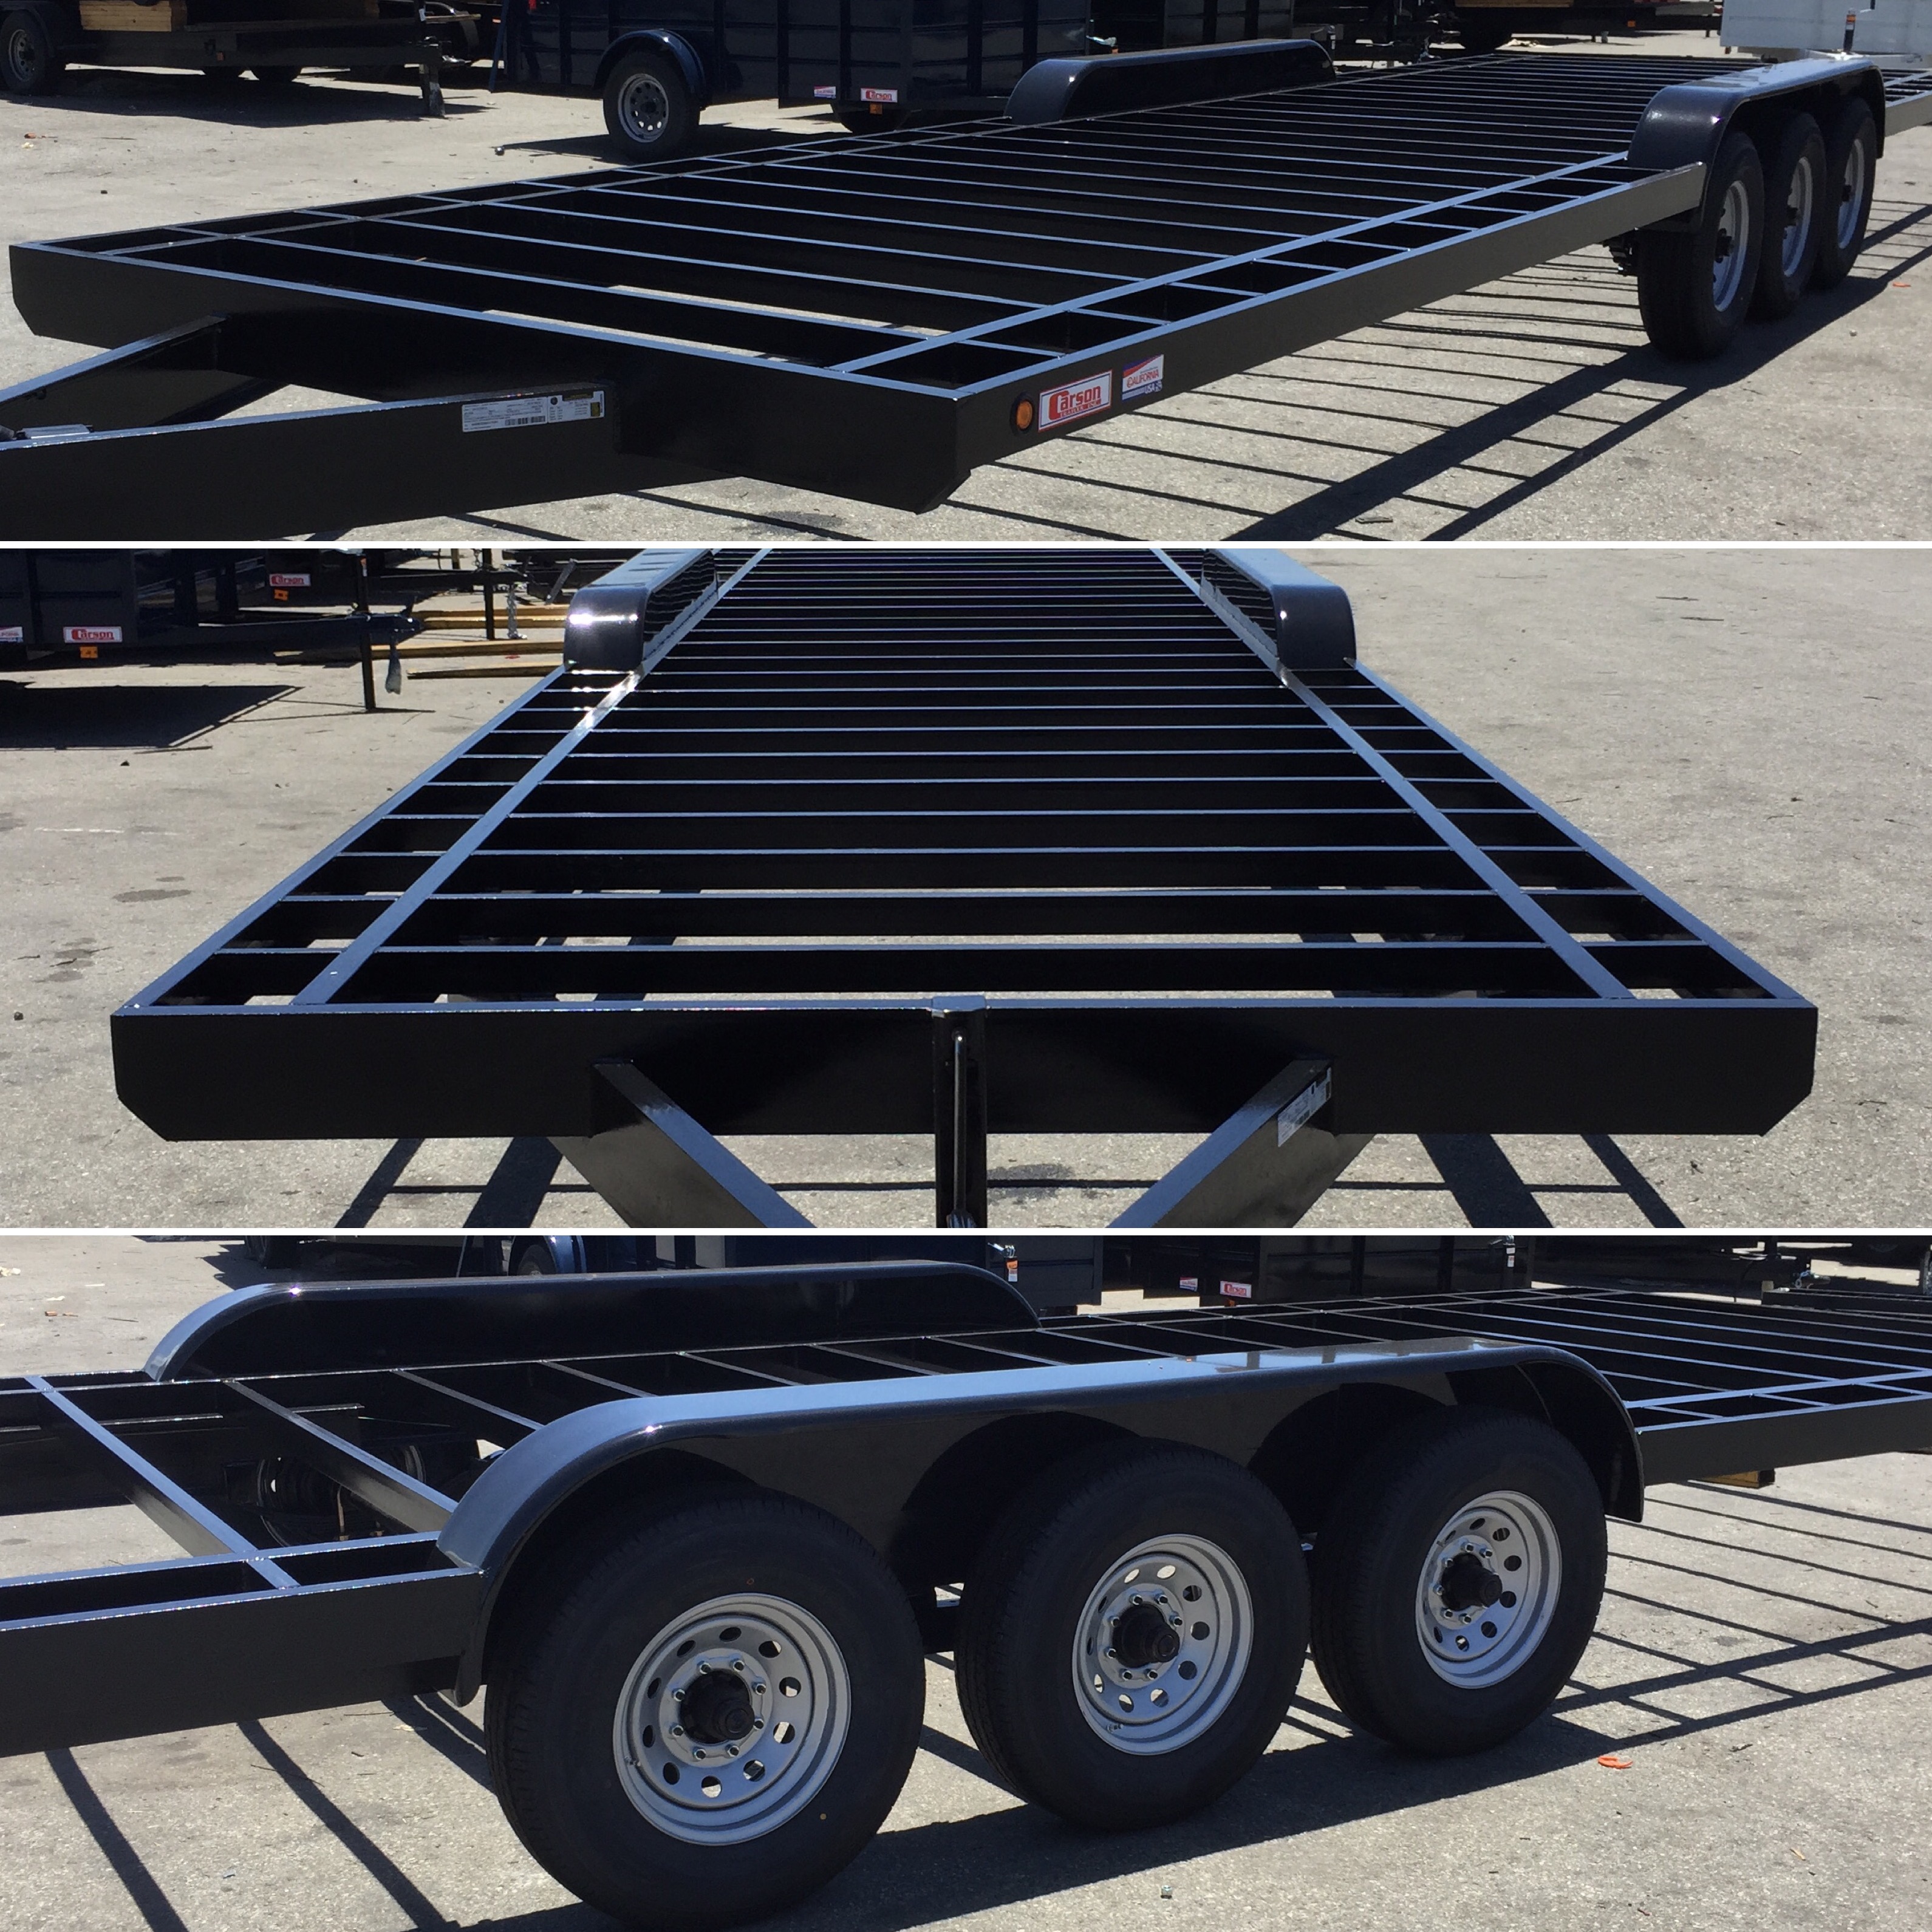
Keep in mind that I’m building on a 32′ x 8.5′ trailer, so I had to order a lot of flashing, but my total cost came out to exactly $700 + tax for a total of 60 pieces of 24 gauge galvanized sheet metal, all with two 90 degree bends in them. I included a few extra pieces in my order in case I needed them (I didn’t). I ended up going with OmniDuct and my flashing was delivered to me here in West Sacramento in just a couple days. This is what the flashing pieces looked like when they arrived.

Subfloor Flashing Ordered by Her Tiny Home

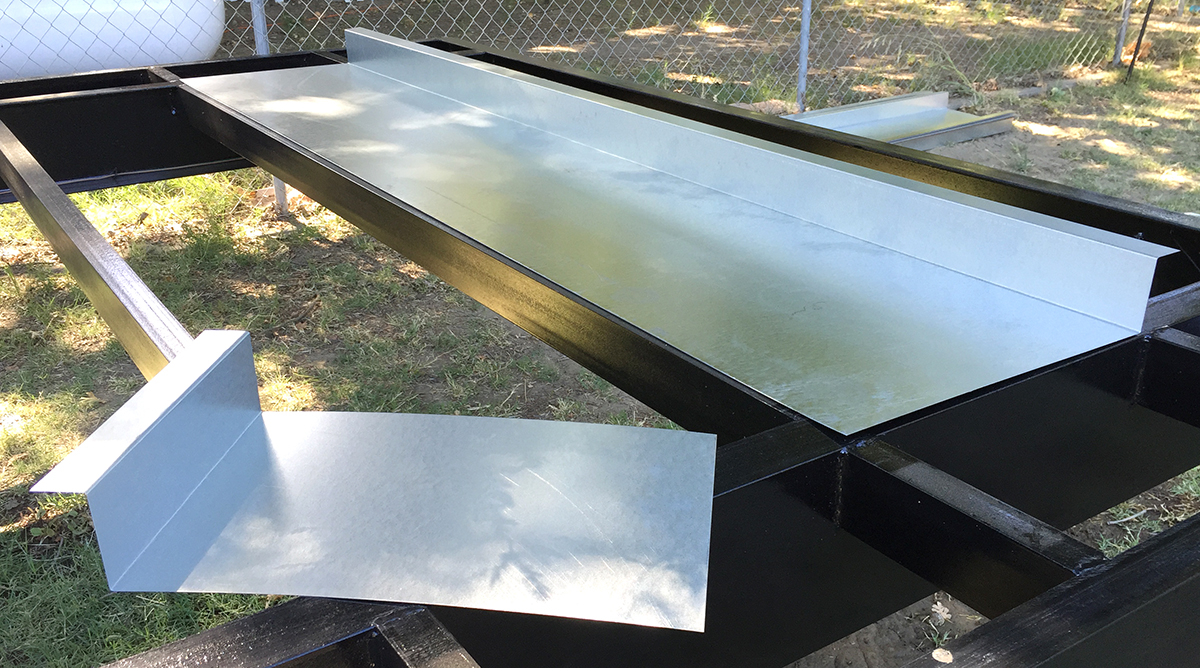
Next, I had to customize each piece to fit within the floor joists of my trailer.

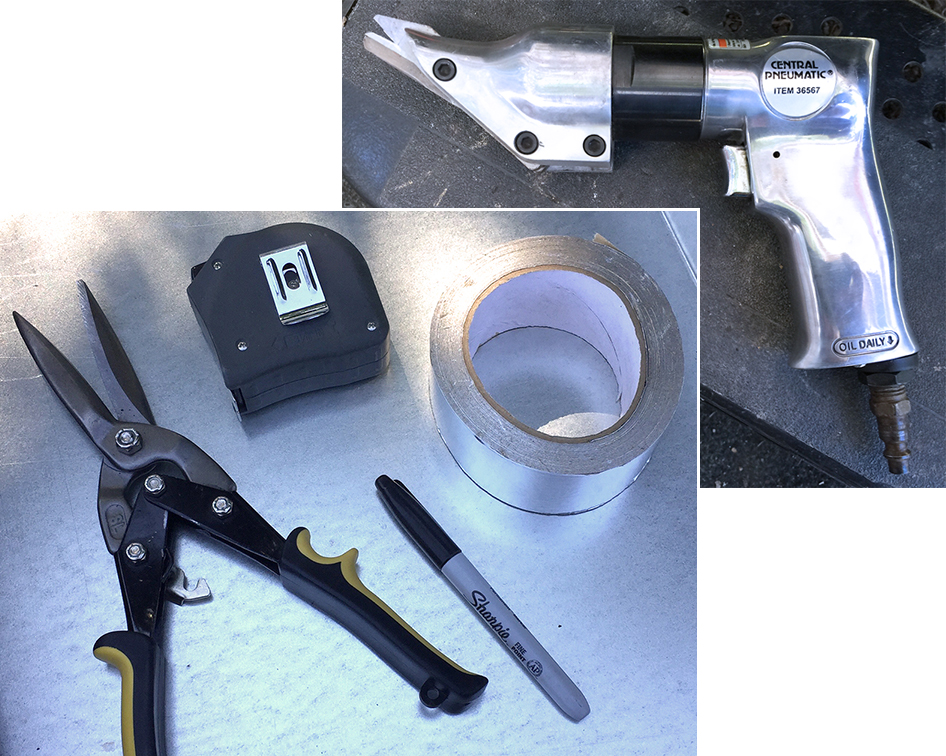
To do so, I used the following tools:

  • Tin Snips
  • Metal Shears: I borrowed a pneumatic metal shear (like this one) for this project, so I hooked up to an air compressor. If you don’t have access to an air compressor, I suggest using something like this, but I can’t guarantee how well it will work.
  • Aluminum Tape
  • Tape Measure
  • Sharpie

Subfloor Flashing Tools - Her Tiny Home

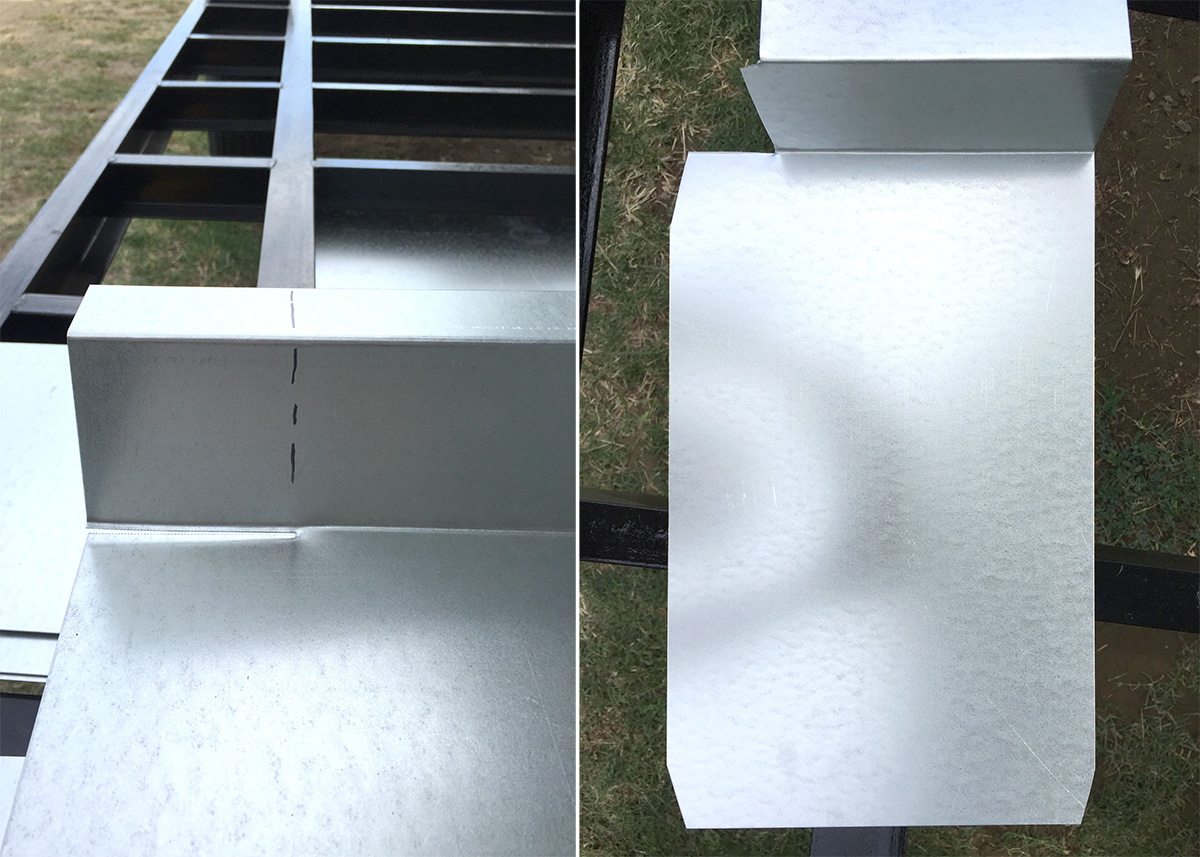
I cut all corners at an angle to make space for the welds on the trailer and I had to cut out a couple inches of the bent sections to fit into the side channels as well. I think photos will speak louder than words here, as I have no idea how else to explain what I did ;)

Flashing Modifications - Her Tiny Home

Here’s a quick video of how the smaller pieces went in once I had the modifications done (and my dad woohooing at how easy it was).

Flashing - Her Tiny Home

On the larger, middle sections, I figured out that it was too difficult to bend them into the space, so I cut each one down the middle to fit the left and right sides in separately (this is where the shears came in, so you could technically avoid having to use this tool at all if you order the middle sections in two pieces already, which could also add to the cost from the sheet metal company). Then I just went back with the aluminum tape and taped them together.

Flashing Modification Large Trays - Her Tiny Home

Flashing Large Trays - Her Tiny Home

Flashing Trays Taped - Her Tiny Home

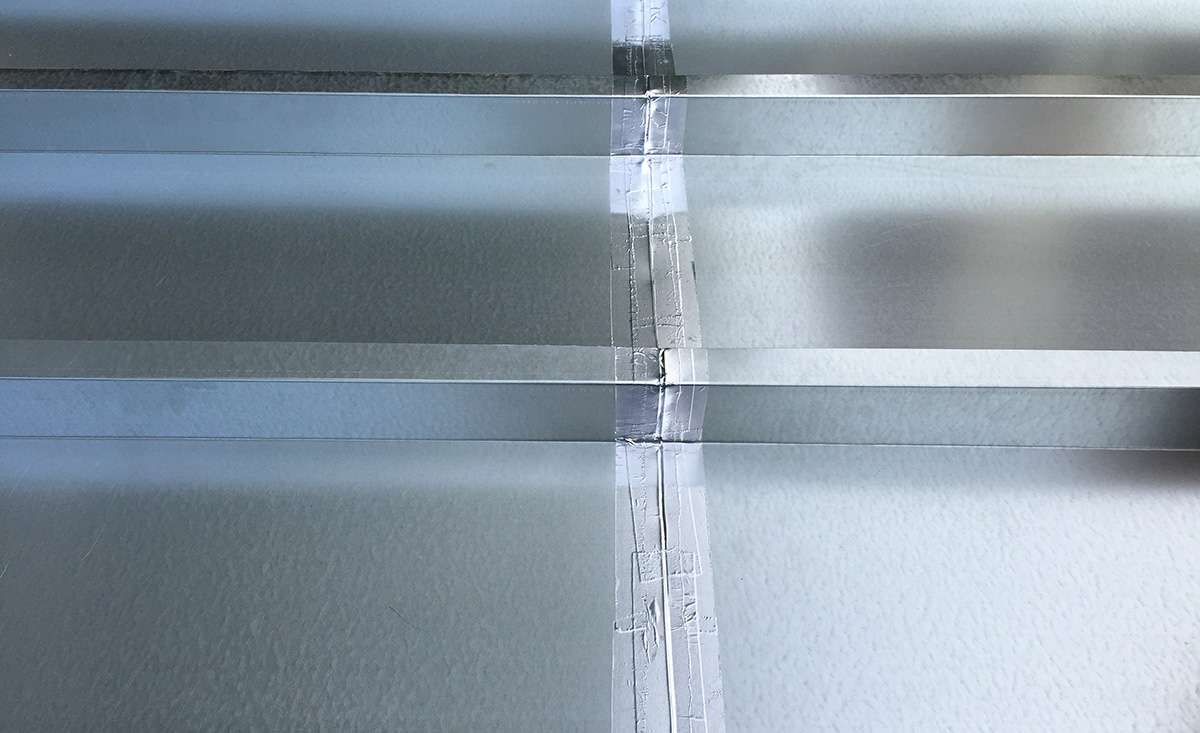
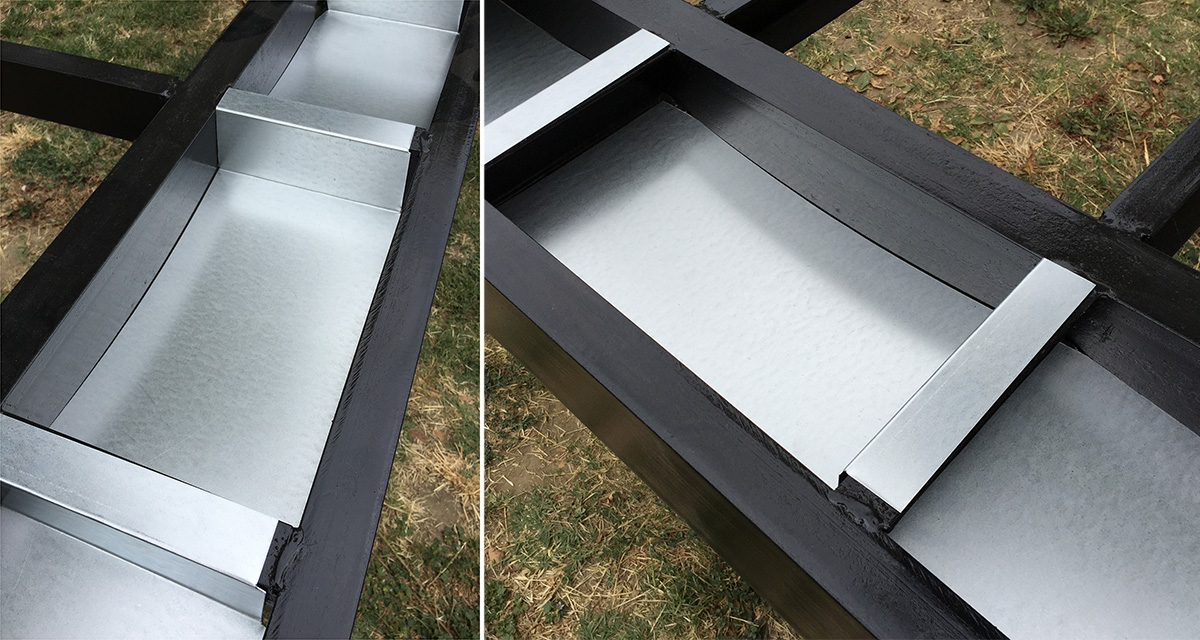
I finished off the flashing process by using the same aluminum tape along the edges, anywhere where there were significant gaps. This was the most time-consuming part of the process.

Flashing Completed - Her Tiny Home

Flashing Completed - Her Tiny Home

That’s it! I’m really happy with how the flashing turned out. It feels really sturdy and by installing my subfloor into the trailer joists, rather than on top of them, I’ve added a few inches of head room in my tiny house as well.

–  –  –  –  –  –  –  –  –  –

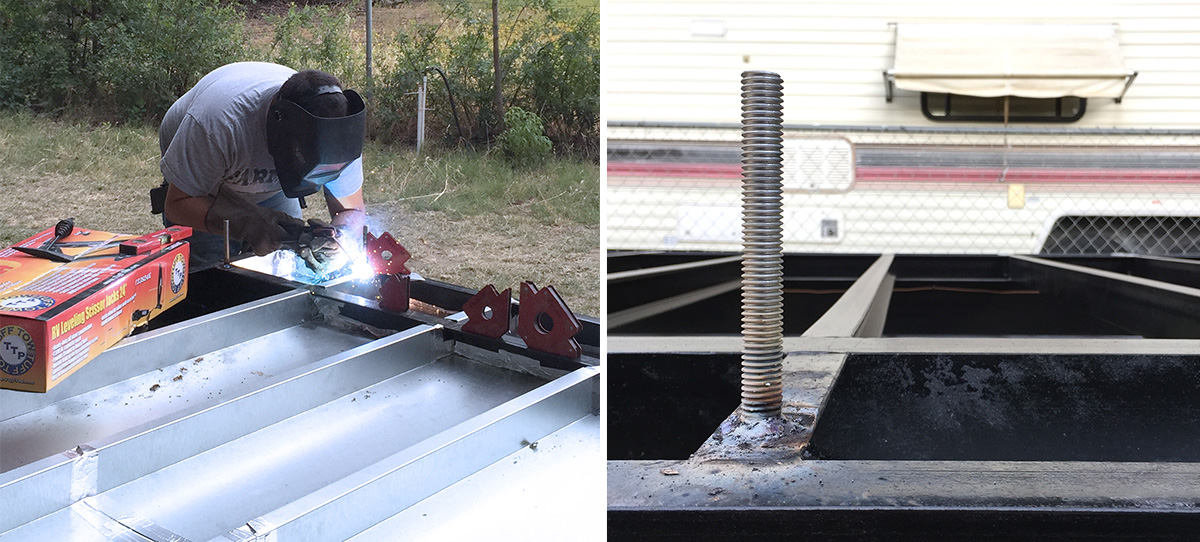
During the flashing process, my step-brother volunteered his welding skills and added 14 bolts to my trailer for me to anchor to when I do my framing. He also welded 4 jacks under each corner of the trailer for easy use when leveling my home in the future. Thanks, Kev!

Kevin Welding - Her Tiny Home

–  –  –  –  –  –  –  –  –  –

Next up, insulation and plywood subfloor.

Not So Tiny Trailer

Thoreau Foundation Quote

Before I placed the order for my tiny house trailer, I spent a lot of time planning and “dreaming” by researching tiny houses online, following the #tinyhouse hashtag on Instagram, pinning tiny home ideas on Pinterest, and watching tiny house shows, films, and YouTube videos. But ordering my trailer really sealed the deal. The trailer is the foundation of a tiny home and it’s really important to know what you want your house to be capable of before you start shopping around.

For me, I had a few requirements that helped me to decide the specs of my trailer. I knew that I wanted to fit two separate bedrooms (with doors) and I don’t want to limit myself as far as customizing the interior of the house. For example, I’d like to tile my bathroom, display a lot of decorations, and store all of our belongings inside the house. The last thing I want is to start building my house and end up wishing I had a couple more feet of space, or a heavier weight limit. I also don’t plan on moving my tiny house very often. I am essentially building a permanent home, with the capability of moving from one location to another, if necessary.

After deciding what my “must haves” were, I contacted Joshua from Tiny House Basics and started in with my questions. He was really helpful, explaining what all the specs meant and what I would need in order to go above and beyond my requirements.

I ended up deciding on a 32 x 8.5 foot trailer with three 7k axles, purchased from Carson Trailers. At this size and weight, I will have to hire someone with a class A license to move my home from location to location. This works for me because I don’t plan to move often.

In the end, my trailer will be the single, most expensive item that I’ll purchase for my house and I have no regrets. Knowing that my foundation is secure and fully capable of doing it’s job is priceless.

Her Tiny Home - Trailer

– – – – – – – – – –

Check back soon. Next post will feature my flashing process.

Gone Tiny

We recently moved out of our 1200 square foot, two-bedroom apartment in Martinez to start building a less than 350 square foot (including lofts) tiny house on wheels on my dad’s property in West Sacramento. With a lot of planning and creativity, our new home will include two bedrooms, a full kitchen, full bathroom, living room, work space, and plenty of storage.

There are many benefits of “going tiny” – the obvious ones including using less energy and water, saving on bills, having less stuff to manage, etc. But one of the larger motivations for me in this decision has been the idea of creating a unique, beautiful space that I can easily afford and manage on my own, for Katie to continue to grow in. I truly believe that living in a home, no matter the size, that has been made intentionally beautiful and simplifying by keeping only the things that one needs and/or loves around them, can help to create a more peaceful lifestyle.

I’m also aware that change, no matter how large or small, is never easy. I think I have at least a semi-realistic idea of the struggles we may endure as well – not only because of the labor that has to go into the build (which equally excites me and scares me), and the temporary living arrangements that may not be ideal (see below), but also due to the differing opinions of those around us. Not everyone will understand the benefits of “going tiny” and I’m having to learn to let that go. I truly believe that this is a great opportunity for me to become a stronger woman. As a single-mom, I can’t tell you how much I look forward to having my hand in the entire process of the build, to learn the ins and outs of how my home functions. I want to be 100% capable of maintaining my home on my own when issues arise in the future.

During the proposed 6-12 months of our build, we’ve gone even tinier, toughing it out in a 1990s camper. This lifestyle does not come without it’s quirks and challenges. We’re in our second week and I’m questioning the gods above on a regular basis. Luckily, the good outweighs the bad. Katie wakes up and heads out to feed the chickens each morning, who freely roam the property throughout the day, we’re steps away from another tiny house build that my dad is currently working on, I’m able to work my graphic design job from home (huge blessing), and my family is close enough to be involved in our lives. So, despite the challenges, Katie and I look forward to basically camping our way through the rest of the year and eventually starting the next chapter of our lives in our beautiful tiny home.

Her Tiny Home - Camper Living

To learn more about what inspired me to go tiny, you can read this post I wrote a couple months ago.

If you’d like to follow our journey, I’ll be posting project updates here on the blog from time to time. You can also follow my designated Instagram account for the build @hertinyhome.

– – – – – – – – – –

Stay tuned. My next post will feature our heavy duty trailer that has officially arrived on site.

Closet to Bedroom Conversion

This tiny house wont be the first home I’ve had to get creative with, as far as designing a room for Katie. Back in 2012, we moved into the 1930s 4-plex that I mentioned in this post. I was technically working with a one-bedroom apartment, but the space had a couple storage closets that were decent sized. One in particular was large enough to fit a twin bed. Problem is, that’s all that would have fit in there. The whole apartment had high ceilings, so a loft bed was my immediate thought. This would essentially double the space in her “room”. I drew up some plans that included the loft bed, plenty of shelving, a tiny closet, and space for two dressers. With the help of my dad, the structure went in pretty quickly.

Katie chose to have chalkboard paint on the top half of the room and purple on the bottom, and I painted the wood the color of the trim in the rest of the house. In hindsight, I probably should have made the executive decision to go with a lighter color on the walls to make the room feel larger, but she ended up covering them with stuff anyways and the joy of seeing her random drawings all over the chalk walls was enough to not care.

Katie still talks about this house as her “favorite”, despite the small bedroom. I’m convinced its because it was cozy and custom-made, just for her. Her new room will be a very different layout, as the whole thing will be a loft. But I plan on customizing it just as much to fit her needs and her personality.

Here’s a good before and after photo:

Yes, that is Justin Bieber all over her walls. She went through a “phase”. We’re very glad it’s over.

Why Tiny?

I’ve been blessed to live in some pretty cool places over the years. In high school, my parents owned a house built in 1936. I lived in the attic room and when we moved in, I refinished the hardwood floors and painted the walls to make it my own. Years later, one of my favorite homes to live in was a 1930s apartment in a 4-plex with original hardwood floors, unique built-ins, high ceilings, and an adorable shared garden out back.

Currently, Katie and I live in a converted 1920s warehouse in downtown Martinez. This two bedroom apartment has a huge open-plan living area with original windows from the old tire shop still in place. We used to rent the adjacent warehouse as well, with only a door separating us from the large cement garage that I used as a shared art studio with a few other artists. I gave up the studio back in November 2014 to save money after realizing I didn’t need the extra space. The apartment itself is very pleasing to the eye and I have an abundance of places to display my ever-loving nic-nacs and treasures I find at estate sales and thrift shops. We’ve enjoyed living here, but I really struggle with the lack of coziness that comes along with living in such a large open space. I also find that I accumulate unnecessary things and I don’t have to pair down and find unique ways to organize them, as we have plenty of space to just leave them where they are. Despite these ungrateful-sounding complaints, I am very appreciative of what we have and the affordable price I’ve been paying for this apartment. With rent skyrocketing in the Bay Area, we couldn’t afford to live here otherwise.

Her Tiny Home - Houses

By far, the home where I felt the most comfortable and content though, was my college dorm room back in 2001. The space I shared with my roommate was just under 100 sq ft. My dad and I had driven the 17 hours up to Canada, both of our cars packed to the brim with my things. The day I moved in, there were a few comments being said, some even claiming I broke the record for bringing the most stuff. I’m guessing if you know me well and you’re reading this, you aren’t surprised. But a couple days later, everything was in its place. I found that I was surrounded by just what I needed and/or loved and it stayed that way the entire time I lived there. I made sure that before I left my dorm room each day, everything was put away and beautiful. The simplicity and ease of living in a small space suited my perfectionist tendencies well.

Since I can remember, I’ve dreamed of building my own house. Not just designing and having it built, but actually building it with my own hands. I had always seen this as a goal that I would reach much later in life, until recently. I’ve watched a lot of shows about building or restoring homes – my favorites being the British ones, such as Grand Designs, Restoration Home, and Restoration Man. For a couple years now, I’ve been watching a series called George Clarke’s Amazing Spaces, featuring some of the many unique small spaces built all over the UK as homes, in-law units, shops, vacation rentals, etc. The wheels started turning (pun intended!) and I began to casually mention the idea of a tiny home to my family. It’s surprising to me how long it took to finally see this as a realistic option, not only for my family, but for myself as well. I think the clincher was when my dad was asked to build a tiny home for a show called Tiny House Nation. There was no denying the reality when a tiny house was about to be built on my dad’s property. Aside from the expected pressure of managing such a project in 7 days, the tiny house build was a huge success. My dad has since started a subdivision of his construction company called River City Tiny Homes. I’ll post more about the build after the show airs this summer (following the rules!) Let’s just say that it’s inevitable to develop a crush on Zack Giffin, whether you’re age 11 or 31.

I will admit that I’m not exactly the ideal candidate for a tiny house. I have a lot of stuff and narrowing it down will take some real effort. But I will also say that I don’t plan on having an empty shell of a home. Character, history and art are so important to me and I find peace and contentment in surrounding myself with the things that I love. I look forward to having to decide what those things truly are. (Aside from my daughter. That’s a given.) Needless to say, the largest portion of my budget will be spent on a heavy duty trailer.

I’ve had the occasional doubt about the decision to build a tiny house, but I recently watched this video and I realized that any space can be made a home. And for me, I believe the smaller the space is, the freer I will feel. Don’t worry, I’m not moving my almost-teenager into a pop-up tent trailer. Our tiny home will meet our needs, plus a little more.

Check back here on the website or follow our build on Instagram @hertinyhome.